How Mr. and I ended up with a new pelican mailbox was entirely unintentional. We stopped by a palapas business that sold metal, pink flamingos to get one for a friend of ours, and thirty minutes later we droveRead More »
Tag: nautical
From Trunk to Table!
I mentioned in passing in this post that we are in the process of redoing our master closet. (Yikes, that was a month ago and we haven’t made any progress since!) But we do have the carpet out of there!
But one positive thing in starting the closet makeover is I had to totally clean it out! And if you remember the pictures from the Under the Staircase Closet , then you know just how much stuff might have been in the master closet!
Back in one corner, under a couple of pillows, bags, and purses, was this trunk that I bought at a garage sale several years ago. Not much to look at, but still in decent condition. (even after two moves) I was using it and another oversize tub to store pictures and scrapbooks. I was able to sort through the pictures (discarding duplicates), throw out old photo albums from the ’70’s, and just get rid of some stuff! What was left fit into a small storage box that now sits on a shelf in the closet!
So that left me with an empty trunk once again. And this is what I did with it.
I turned it into a super cute table with storage!
It was a pretty simple project. I did the usual primer and paint steps. After it was completely dry, Mr. drilled holes in the bottom and hammered threaded inserts in the inside of the trunk for the legs .
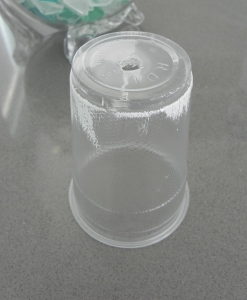
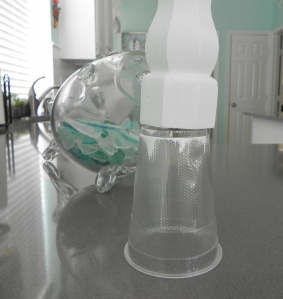
To keep paint from getting all over my hands while painting the legs, I poked holes into the bottom of some cheap plastic cups. I was then able to screw the legs into the holes and viola…instant “keep paint off my hands leg holder thingy”!
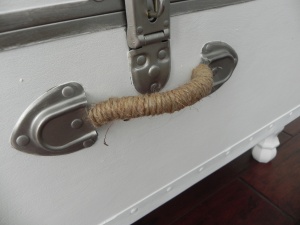
I cut off the old handle, wrapped jute around a piece of cord, and hot glued it in place. I thought this gave it more of a coastal look.
I plan on using it as a coffee table and storing a couple of light throws and maybe the various remotes we have in it.
Y’all have a great day!
~
It’s not U..G..L..Y any longer!
We had a good visit with my mom last week. We went shopping for curtains for her living room, but ended up with only a valance for her kitchen window. Spent a day in Galveston, eating lunch and going to a big, tourist, gift shop on the beach…Murdoch’s Gift Shop. I love touristy shops! I’m a sucker for ’em and all the stuff in ’em! I bought the cutest shell mobile for my kitchen.
I was finally able to get my table and chairs finished for the breakfast area. Spray painting and the Houston humidity does not jive well together. Especially in August!! I painted the table inside the house but spray painted the chairs in the garage and then put them outside in the sun to dry. It was overcast and every time it would start sprinkling, Mr. and I would make a mad dash to get them back inside the garage and then back outside to dry in the sun. This went on for several hours. But I am sooo happy with the outcome. The color is Glidden Canary Song and I finished it with MinWax Paste Finishing Wax.
I bought the table and three chairs at a junk store in Oklahoma and the bench came from IKEA. I had already started priming the pedestal when I remembered that I needed to take a before picture! I still need to find some fabric and make cushions for the chairs and bench. I’m thinking something colorful and cheery.
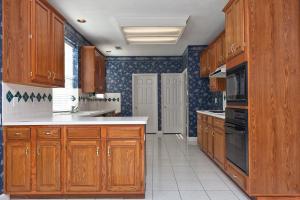
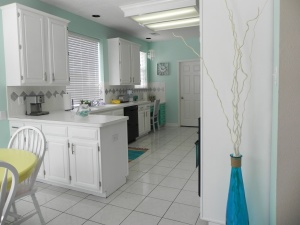
Phase 1 of the Kitchen makeover is complete. And what a difference paint makes!! The kitchen was “U..G..L..Y!!! You ain’t got no alibi. You UGLY!!” (those who watched SNL in the ’90’s will understand my little UGLY cheer) ;0) The wallpaper was blue with mauve roses & light green leaves, cabinet hardware was gold (which matched the hardware throughout the house), and the diamond, backsplash tiles were dark green!
The upper cabinets were in decent shape, but the bottom ones had mild water damage. (looked like the previous owners would hang wet towels/dishrags over the doors to let dry, so the finish was coming off) The electric cooktop had also seen better days, as all the coils were sprung. Therefore, all the oil would stay on one side of the pan, which meant you had to cook on one side of your frying pan! :0) Of course the new cooktop wouldn’t fit in the old hole. So with a little painters tape and a saw, Mr. cut a bigger hole and installed a new ceramic cooktop.
But the real change came with the paint. We painted the cabinets in Valspar Enamel white, the walls in Valspar Grand Hotel Mackinac Blue, and the desk in Valspar Nautical. We changed out all the hardware (pulls, hinges and door knobs) to a brush nickel finish.
I’m still up in the air about what type of countertops I want. I know I want a light grey color, but can’t make up my mind whether I want grey stone or concrete countertops. But for now, I’m pretty excited about how it looks so far!


